Showing posts with label redwork. Show all posts

Friday, April 29, 2011

more pennies for rylee freebies

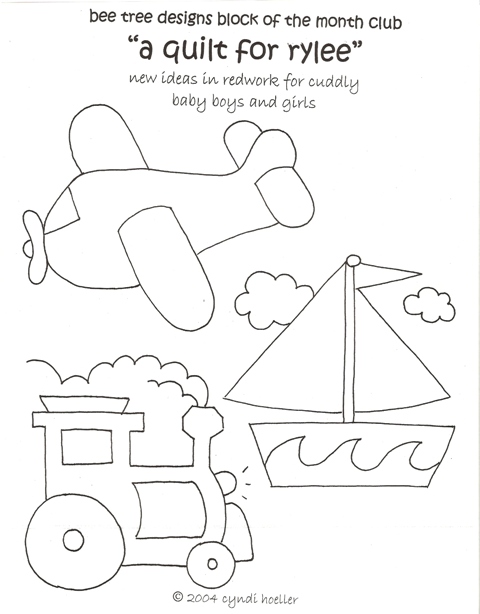
Here are some more of the penny square patterns for the quilt "Pennies for Rylee".


Ooops it appears I missed scanning correctly, you may have to draw in the left most part of the baby boy shoe.


Quick and easy little penny squares from this quilt below, plus some for girls.  Directions yet to follow.  Embroider them on them on 6.5" squares. 


What's really cool is this antique wicker stroller that the quilt is laying on.  Wish I could show you more, but I cropped most of it out, so the quilt would be more of the focal point. I don't think I have the original photo anymore.  I used it while it was at a consignment store to take the picture.  I am pretty sure it's still for sale.  It's so cool!!   If I was a professional photographer I would snatch that stroller up. 
Enjoy your day!!  For once, it's sunny here, second day in a row with NO rain!  need more time to stitch something, anything!!  Cyndi


Tuesday, April 19, 2011

the CR quilt & freebies

Before the bottom fell out of my world, I did manage to finish the top my daughter's friend's asked me to make for her sister.  It is a CR quilt (Crown Royal).  I did not get it done on time but I did manage to struggle through and get it done so she could have it for Valentines Day.  Since I did not get it done as planned, I did not charge her.  I apologize for the unappealing photos.  It 's very hard to take pictures of a black quilt period, then in poor light and compounded by my inability to take a decent picture. So, here are some of the pictures I have.  It' s mad of solid black plus 3 black prints and the purple Crown Royal bags that I cut into pieces, lots of pieces!!!
(excuse the stuff my daughter had next to her bed.  I didn;t move it, was in a hurry)
Hopefully once the owner has it quilted she'll send me a picture!! 


There are 3 different blocks that make up the quilt.

Here's one more of it.  My daughter tried to take this one with the window shining through it, not good , but you can see more of pf the whole quilt.  Quilt, unbound, measures 118 in x 118 in.

Here's some more free stitch patterns for the baby quilt.


Enjoy these and hope everyone is happy, calm and stitching something today!!  I 'll pop in and see what you're up to one of these days.


Thursday, April 14, 2011

Pennies for Rylee pages 7 & 9

Didn't like the header, So will putting a picture of the pattern in each post with these pattern pages.


and in case you are wondering............I just picked another page.  Pages 3-6 and 8 will show up later.


You maybe could use the bunny, chick or lamb for Easter???
Seems to me the bunny was a bit oversized. You may have to shrink it a little.

These patterns are from this quilt pattern below.
Check earlier posts for other pages.
Have fun.

Tuesday, April 12, 2011

Pennies for Rylee page 2

link to google docs pdf : Pennies for Rylee page 2
First of all, Thank you for all the heart warming comments.  I love all of you!! Here's page 2 of about 15-16?. Anyone done the first ones?  One thing about them is, they're quick and easy.  
NOTE: if you're just joining in, this is the picture of the quilt these patterns are for. 

Directions to follow in a few days.  See more on my previous post.  Bee back to see you is a few days. Have fun!! Cyndi

Monday, October 4, 2010

M-M #9 & A Winner Update

update: forgot to draw for the HOW Ornaments and Frosty Flakes blocks yesterday!!
it was posted way back in August on my 100th post and didn't close until the weekend after Dawn Hay finished her Frosty Flakes posts.......which was Wednesday I think.  See what you miss out on if you only LOOK at pictures ..just did the random number generator and guess who won.............
this is what she won........

the stuff from my former header (I took it down last night and am going to find somethine new, so the licorice twist quilt will fill in till then) plus I am including some suprises for her...

Woohoo my Sweet Paulette, will email you shortly, Congratulations! sorry I couldn't give everybody something. I have such great followers and get such nice comments!!
NOW, FIRST, If you're looking for the Fall into Fall giveaway click next link and go here....
Oh my gosh I got so many wonderful emails, sometimes I cannot keep up , I still have about 40+ to answer and more keep popping in there.  Still having the problem with no-reply bloggers and "anonymous" people. 
 On another note,  here is the reworked grey tabby "Pudgie" fat cat pattern PDF link.

If you're not here for Fall into Fall, then you must be here for MYSTERY MONDAY HOW #9,  My oldest granddaughter and I were picking up the remnants late yesterday afternoon of her paper "free for all" from Sunday morning grrrrr, when I decided what I wanted to draw for this week even though I had some extras from last week...will save those for later.  So I got the paper and pencil box/crayon box and drew a picture, one with a little twist of words that made her laugh!
And after I stitched it decided it wasn't quite right.........and  since the crayons were sitting there anyway, decided to add a little color to the center, then I got carried away and did more.  My suggestion to you is, if you decide to crayon yours.......DO it before you stitch!!
so here you go.....
a pear in a partridge tree!!! hee hee hee!

Now I didn't start on this till late afternoon, and then I had to go make more soup because it definitely was a soup weekend, Saturday was taco, yesterday was potato and now we have enough for several more meals. We freeze taco, not the potato.  I regress, anyway I was stitching, re-assessing and then adding color and answering the 200+ emails (yikes!!) and even though I was up till 3am talking to a lady in France about the language barrier we had. (  She had used this foreign word in her message and I told her I wasn't familiar with it, laughing the whole time (the word was "housework")  hahahahaha!! )
anyway, due to this and that I didn't get the next one completed , but it is far enough along for you to use your imagination on the finished product... 
and to go with the pear in a partridge tree,
a little wren and holly

here's both


here's what pattern will look like, but the pdf is sideways (11 x 8.5 insead of portrait at 8.5 x 11),.  It will print okay. The link to google docs is below it

Okay, I think this is not one of my best days.  Am behind at finishing ornament today, and posting, then realized I left pdf at home for pattern and only had .jpg to add here, so, had to mail it and wait for return via other daughter who says she can convert jpg to PDF but says she was busy so it took a little while and while I was waiting........ on top of that................
horrors of horrors,
a cutie pie named Janet, one of my formerly "no reply" bloggers from Friday just emailed me about the ornament drawing, I said "Holy Carp, Batman, I completely forgot to do that yesterday!   So now all you ornament entrants from the last few weeks are going to have to wait until I get home from work!!!  But Thank YOU, Janet for reminding me...!!!
SORRY you guys,  well........it is Mystery Monday, why not make it more of a mystery, like where I left my brain??.....drawing for that this evening... sorry no new entrants for that giveaway, unfair to others who got in on time!
But there's still the Fall into Fall giveaway, if you haven't done that yet. 
Will be talking to some of you at lunch or this evening when I get around to answering emails again.
So what's up with you, hopefully nice weather at least, nice cool, crisp autumn and spring days, depending on where you are??


Monday, September 20, 2010

Mystery Monday HOW #7

SORRY......I DID NOT GET THE PDF FOR ANATOMY OF AN ORNAMENT FROM YESTERDAY DONE AND ATTACHED, IF YOU NEED IT, I WILL GET IT ADDED THIS EVENING
but here are the ornaments for this week.......after last week's color fiasco,  I hopped back into my comfort zone and stayed with one color stitching.  Whew, soooo much easier!!!
Mystery Monday HOW #7

NOTE the 3-D WHISKERS

I did this one like Carrie's version with no extra piece for back blue fabric(notice folds on front).  It is cut about an inch larger all the way around each edge, once folded, the stitchery hexie covers up raw edges of blue hexie, note I stitched stuff on back of blue BEFORE attaching to snowlady see next photo.  The lighting is weird and the colors are off, it looks turquoise.........is actually fabric color in above pictures.


more later...............gotta go, this will get you started!

Sunday, September 19, 2010

anatomy of a HOW

First of all here are my stitched ornaments from last Monday, was a crazy week and I just finished them this morning. I am not real happy with them ( not real thrilled with the colors I chose)...........am a redworker, have trouble choosing more than one or two colors sometimes, lol!!!  AND.....
several have asked how I put the Hexagon Ornaments of the Week (HOW) together............I'm sorry I didn't write better directions.  Am so absent minded that I just assume people know what I meant, forgetting there are other ways to put them together or that there are beginners that need explanation, I am sorry.  Sooo here is how I've been putting together the ornaments lately.

This is where I start. So if you want to keep a nice copy print 2 copies. I cut the pattern apart. 
I cut from thick stiff interfacing for ornament A- 2 of the biggest templates and one of the smaller one, and the same for ornament B, two large, one small.  From FABRIC cut a piece bigger than each of  the templates too, the two smaller ones for each ornament are in your stitch background fabric and the big ones in contrasting fabrics.  The first one I did only has fabric on the back, the second one has 2 pieces of felt for the large templates.   I stitched the felt back before attaching to the front.  I like two sided ornaments and since then I have either added stitching on the back or adding other surprise backs for the people who win my giveaway (are you registered? you have until the Sunday after Dawn Hay's last Frosty Flake posts)  
Here is what I cut for ornament A along with my pieces from last week.
I usually attach the front stitching with some lazy daisy stitches but this week since the stitching intentionally fell off the edges here I just attached the front to the back hiding the stitches between the layers.
Here is the front and one of Dawn's frosty flake outlines for the back.

Then you have to stitch the back to the front like I did on the reindeer one from a couple of weeks ago below, here's the back & front.  (same fabric bad lighting)

match up edges and stitch together like this below.

 
showed the red because the brown and blue was too dark to see on the photo.
BUT WAIT....................
Carrie P from A Passion for Applique cut her fabric larger than I did so it would cover more of the template and appliqued her bird on the the side with the fabric folds, eliminating the need for extra back piece fabric and interfacing.  Look at the beautiful job she did stitching below.  Now if you look close she has her folds to the front and it looks GREAT.  SO yet another way to finish them, Thank you Carrie.  Go visit Carrie and see all the beautiful thing she does.

So I tried on on my ornament B this week

It worked fine,  but wish I had had yardage of this fabric for the back then I could have fussy cut it to get the snowflake in center, but it was a charm square, so it is off center some. added a few stitches on back for interest before I attached front stitching hexie.

will attach a PDF FORM  of tutorial in the morning with my next Monday Mystery HOW #7


Don't forget if you're a quilter with a blog and want to be part of a REALLY BIG giveaway go to Debi's Fall into Fall blog, CLICK on my sidebar for a link.  She's looking for 200 bloggers to participate and thousands to enter?

Monday, September 13, 2010

Mystery Monday HOW #6


I am so far behind, no progress on the CR quilt, but I did get something drawn for Mystery Monday, but have not had time to stitch it out.  I had to make a last minute dress for DD3 on Friday night, and I was swamped with some unexpected last minute work from work, I had to work Saturday at work unexpectedly and then worked rest of weekend getting address labels on 800 postcards from a list of who needed postacards in alpha order by LAST names working with a set labels they sent me in alpha order by FIRST name!! not a fun  job, it should have been a simple job but noooooooo!!  I knew I had to do the postcards, but not that the list and labels were so different, grrrrr.   and it wasn't how I planned to spend my weekend.  I finished at 10:46 last night.  Eyes were tired too to stitch....will do that later today, so here you go. you'll have to guess what I was going to do!! ; )  click on words under any of the pictures for a link to google docs for PDF

Oh and I forgot we had to make a pink tractor cake for GD#2 's 4th Birthday party sat afternoon, daughter baked cakes, and other daughter and I assembled and frosted it. She got a dog that had googles on so she's wearing them.


.

HAVE FUN! SEE YOU NEXT WEEK IF NOT BEFORE. 
HAVE YOU SIGNED UP FOR THE GIVEAWAY ON MY 1OOTH POST?

Thursday, September 9, 2010

Frosty Flakes & CR process

here is block # 6


Here's what I did with Dawn's Frosty Flakes from last week.
I turned them into ornaments, I really like the blue

And then there's the Crown Royal quilt process.  Years ago I saw this handy hint about placing templates on your rulers when cutting funny pieces.  Can't remember if I saw it on TV or in a magazne but I used it on my first kaleidoscope quilt and it works very well.  I made multiple copies of the pattern piece and used a water soluble glue stick to glue them to the bottom of the ruler making sure I got the correct 1/4 in and am not risking trimming the paper pattern or my fingers as I go.  I got both angles and the square corner.  After I'm done, I can remove paper with no harm to ruler and wash glue off.  I measured the shape of the kite keeping fat corner square to ruler, I need 6.75 strips and from those strips I can cut 7 kites.  The kite shape should/must be cut with the fat end cut with the grain in order to keep the outside edges of the completed block on straight of grain.  If you don't cut them that way the stretchy bias edges on the block can cause waves and disaster.  If you want to fussy cut this shape this way and that on fabric and end up with bias edges you need to be SUPER cacerful sewing blocks together.
If you haven't noticed, then I have to tell you this quilt makes me nervous..........I really want to do a good job, but it has taken me out of my comfort zone with all these blacks and the tight value change.  I cut some the kites shapes /pieces and laid them out on the Fairy Frost black fabric she wants to use for the background. I like it and it is better than I expected in regular light, but in low light still  appears mostly all one color. 
Here's a few pictures in regular light


oh and I re-assessed my fabric bag needs........

only have to cut up 40 bags since blocks are bigger and now I only have this many left to cut up.  She'll have a lot left.  at one time she had a pattern picked ou that took 180 bags one that took 300, etc we looked at a lot of options.

off to work in a little while,  more on the CR process later. 

Sunday, September 5, 2010

ornies and a quilt


These are some of the things I've worked on in the past week.

I made some of the Frosty Flakes #5 from this week
 into Frosty ornaments!
They are designed by Dawn Hay of As Sweet as Cinnamon, her newest project a BOW(block of the week), she's only on week 5 plenty of time to catch up!!
and I finished the quilt below........... but I had to roust out Cami from her reading chair before I took quilt pictures......I painted the tree on the wall of my granddaughter's toy room the same day we painted the walls a different color other than construction "cream" that was 20 years old ( the former owners never painted the room just used it for storage.)
amazingly enough the tree is only one color of brown paint.  one brown.............what?  no I am not lying........... I drew on the wall with the big sidewalk chalk so I would basically know where to paint the base color.......but there was some sort of chemical reaction with the wet paint and the chalk and this is the result........Once I realized what was going on added some extra chalk on top of the wet paint figuring if it didn't look okay when dry, I could paint over it with more paint.  once it was dry looked  good enough for a toy room so I added the leaves in green.  Has not come off and that was 7-8 years ago.


the baby quilt my daughter needed for good friends of theirs.
here's the back

I have to go back to stitching now or I won't have any thing ready for tomorrow...............
first I need to go draw something and then stitch it out lol!!!!!
until tomorrow.......or later tonight maybe............have a good one!