MONDAY MYSTERY STITCH
Well, this is the end of another monday mystery. I had fun. I hope you did too. First I apologize for my pictures, I am terrible taking pictures and the lighting is worse.
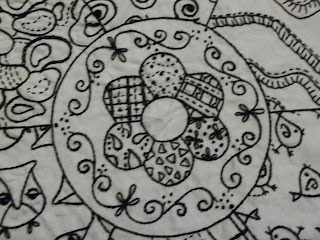
Take a look at my examples. I left the red and cream as is because I was planning for it to be a doily of sorts and have a candy dish sitting in top of it, so no one would see the center anyway. The rest of them have a finished center. I embroidered the centers before I got a clean drawing to give you, so they vary slightly, and I intentionally put my own spin on the teal and lime..... If you want the bees, email me and I will get them too you.
Here you go...............
Trimed for sewing,
DMC498 on cream
my favorite tool when turning curved pieces inside out.....pinking shears, gives you a nicer curve than when you just trim close with regular scissors.
Don't forget to clip corners too.
This one below is off just a little but close enough, I missed the inside corner slightly.
My candy dish doily, now if I only had a candy dish full of starlight mints.
BLACK & WHITE
For this table topper, and less fuss, use the circle rather than trying to sew around each of the petals. I added jmbo rick rack for fancy edge. I think I forgot the flash, this really is the black and WHITE one, lol!
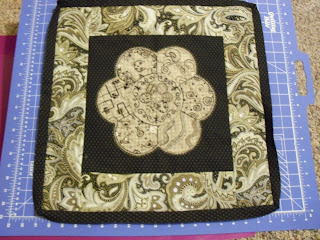
Next up, black, creams, tans, browns on a tan tone on tone print
For this one I needle turned appliqes it to a black and tan print background, top stitched the applique. Then
went back added a row of stitching on the background for a little extra detail. I squared this one up to 12.5" cut 3.5, strips, (2-3.5" x 12.5", and 2 pcs 3.5" x 18") cut 2.25 binding strips and managed to join my binding at the bottom the way you are supposed to.......That is something that has eluded me for ever........My mom and the quiltin' chicks have shown me numerous times and it never stuck then last month when I had to bind the snowball quilt I had to ask for help again, but I remembered what they taught me............(If any of you have trouble joining the ends of your binding let me know and I'll do a tutorial. I need something to remind myself anyway. )
This one is going to be a wall hanging, but if you notice I still have the quilting and tacking down the binding to do yet.
Now for the TEAL & LIME
I made a throw pillow out of this one. I squared the center up to 11 inches and added corners. To add corners, cut 2 squares 8.5inches then cut them once on the diagonal.. They are cut oversized. Find center of edge and center of each triangle and pin, make sure that the "ears that hang over are even. Sew 1/4"seam. Now do the opposite corner and repeat finding centers etc with another triangle and sew. Press open, pushing the seam towards the triangle. Now do the other corners, and repeat the centering, sewing nad pressing with the other corners. Square up and add pillow back.
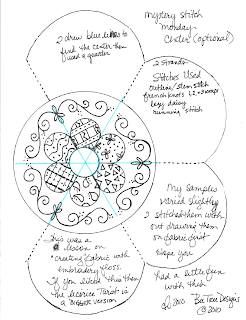
As always click on the words below the picture of the diagram to get the pdf for it at google docs.
HOPE YOU ENJOY THESE MINI PROJECTS...........
UP NEXT MONDAY, A QUICK PROJECT FOR 5" or LARGER SCRAPS.
You also need some batting scraps.
You also need some batting scraps.


I just wanted to thank you so much for the fun stitching project and the many ways it can be used. I will admit I haven't kept up with you. It is really hard for me to find time to stitch this time of year. I know I will use it tho and I have learned so much about creating designs from you. Thank you being so generous and sharing your talent with the less talented--that's me. I look forward to trying this in different colors. I think this will make great gifts.
ReplyDeleteSEW cute!! Your stitching is stunning!!
ReplyDeletePaulette
Oh now you did it...gave me too many choices to pick from. I like them all. Guess I will do the stitching and then decide which one to do. Thanks for sharing your talent with us on this project, its been fun and I do love the center design.
ReplyDeleteCyndi, your projects turned out very nice. GOOD JOB
ReplyDeleteWaiting to see what you will come up with next. I have gotten way behind on this one.
Betty
This has been a fun project. And yes please, I'd like the bees. I received my snowball prize from your giveaway on Friday. I haven't had a chance to pull it out and really look at it yet (father's day, babysitting grandkids etc) but I will be doing that soon and probably starting on it right away. I need a new hand stitching project (not really but I like to fool myself that way - then I always have lots to do:) Thank-you so much - it looks fabulous!
ReplyDeleteCyndi, your embroidery designs are awesome! You are so very creative and talented! Keep making fun projects!
ReplyDeleteCyndi~every single one of those projects are so cool...I love them all...but my most favorite is the teal and lime! And I love how you turned it into a pillow. Hmmmm, maybe I need to take up needlework!
ReplyDeleteGreat job!
XOXO,
Cyndi from OH
It's beautiful!
ReplyDeleteOh, they are all so great. You are so talented. Can't wait to see what you are going to do with the scraps.
ReplyDeleteI really like the designs. Where can I find part D?
ReplyDeleteW. Ruger
jwruger@bellsouth.net